Set up WebGlazer from sign up to your first AI visibility results in the dashboard.
This guide walks you through the setup wizard at app.webglazer.com, from creating your account to seeing your first results on the Overview. You need your website address and a payment card for the plan or free trial.Your first run starts as soon as you finish setup. The engines usually answer within about four to six minutes, and your results appear on the Overview when the run finishes. After that, your data updates once a day without you doing anything.
About 4 to 6 minutes, then your results are on the Overview.
1
Create your account
Go to app.webglazer.com and choose Continue with Google, or enter your email and a password and click Create account.
2
Choose who you are tracking
On Who are you tracking?, pick My own brand to track your own company, or My clients if you are an agency.This guide follows My own brand. Agencies first fill in Your agency and then add a first Client project. See Agencies.
3
Step 1: Project details
The Project details step opens a screen headed Brand setup. Fill in:
Website URL: your main website.
Brand name: the name AI answers should use for you.
Market and Language: where your buyers are and the language they search in. WebGlazer may suggest these from your website. Click Use this to accept the suggestion.
Click Next. WebGlazer creates your project and starts reading your website.
Illustration with sample data
4
Step 2: Brand understanding
WebGlazer reads your site and fills in your Brand profile. Check and edit each part:
Description and Category
What you sell: your products or services.
Who you sell to: your buyers.
Who you compete with: suggested competitors. Remove any that are wrong, or use Add a competitor.
Question mix: how much weight to give each buyer stage: Learning, Comparing and Buying. The About you switch adds questions that name your brand.
Click Next. Your changes save as you go.
5
Step 3: Topics
On Review topics, pick the subjects you want to watch in AI answers. The counter next to Select topics shows how many you can keep. Edit a topic name, delete one, or add your own with New topic.Click Next.
6
Step 4: Prompts
On Review prompts, check the questions WebGlazer will ask the AI engines, grouped by topic. Edit or delete any prompt, or type your own in Add a custom prompt. The counter next to Select prompts shows how many you keep against your limit.Click Looks good.Not sure which prompts to keep? Keep the ones a buyer would really ask, and leave your brand name out of most of them. See Prompts and topics.
7
Step 5: Review and choose a plan
You see a summary: Setup complete, how AI describes you today, example questions, and the competitors you are Benchmarked against. Click See my plan.Pick a plan. You go to Stripe to enter your card. If your account can get the free trial, the Basic plan shows Start 7-day free trial. See Plans and billing.When checkout is done, Stripe sends you back to WebGlazer to finish the last steps below.
8
Pick your AI engines
Back in WebGlazer, Welcome to WebGlazer shows the AI engines. On Standard and Advanced it says “All 5 AI models are in your plan” and every engine is on. On Basic it says “Pick up to 3 of the 5 AI models”. On an agency plan you pick 1 to 5, and a line shows how many daily credits your choice uses. Click Continue.You can change engines later. See Engines and schedule.
9
Answer a few questions and invite your team
Answer the short questions about your role and goals, then How did you hear about WebGlazer?.On AI visibility is a team effort, enter teammates’ emails, pick a role, and click Send invite, or click Skip for now. The roles are Company Admin, Member (shown here as Company Member) and Viewer. See Team.On Setup complete. You’re ready to go., click Explore insights.
10
Watch your first run
Your first run starts now. The Run Progress popup opens over the Overview with one ring per AI engine. Each ring fills as answers come in. You can close the popup; the run keeps going.
11
Read your results on the Overview
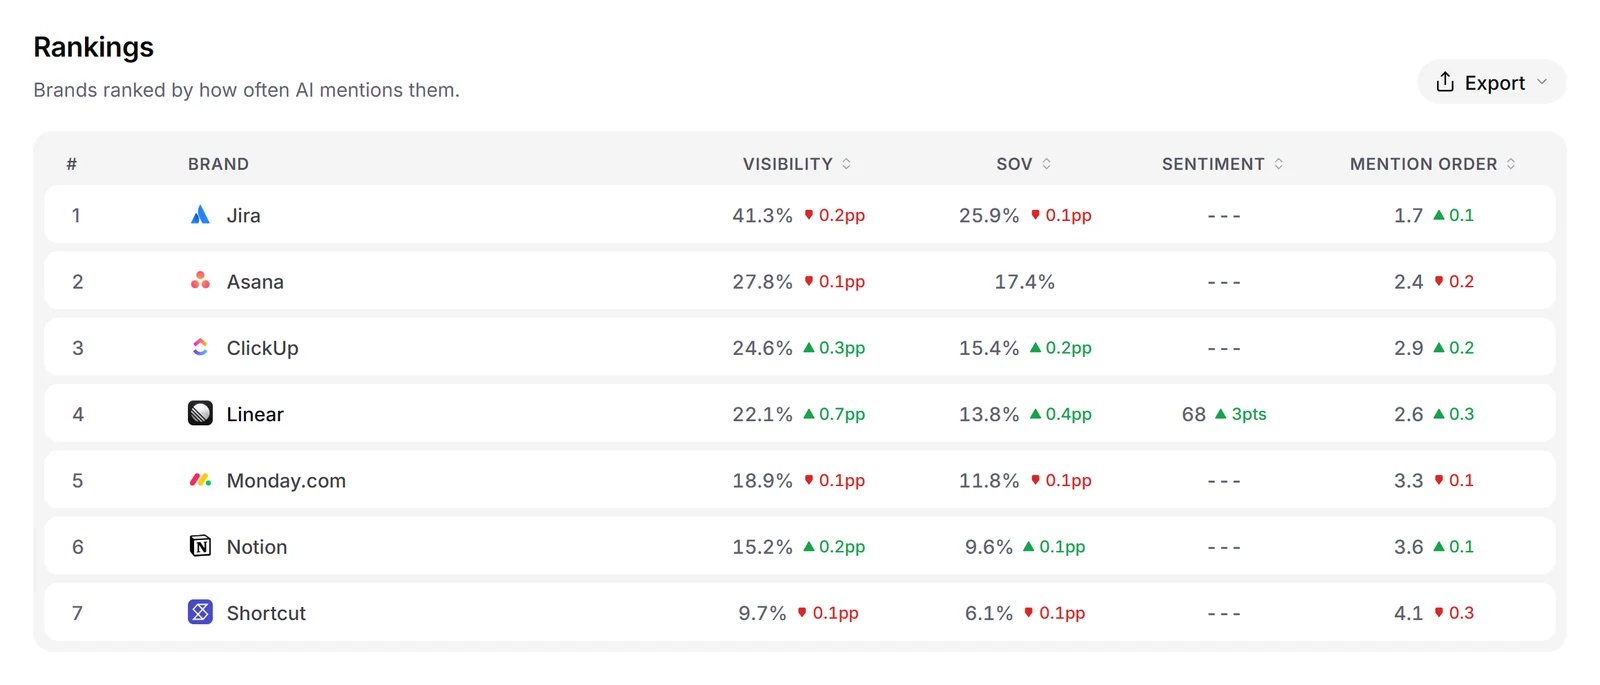
When the run finishes, the Overview shows Visibility Over Time and the Rankings table, which compares your brand with your competitors on visibility, sentiment and mention order.
After the first run, WebGlazer asks the AI engines your prompts once a day for each brand and records the answers. New data shows up after each daily run. You do not need to do anything to keep tracking.
Go to Settings > Brands and accept the competitors you want to compare with from Brand suggestions. Only your own brand and the competitors you track count in Rankings, Share of Voice and the other competitor numbers. A brand AI names that you have not accepted is left out. See Competitors.
Open AI Visibility > Prompts to see each answer and where your brand appears.
{"docsConfig":{"theme":"luma","$schema":"https://mintlify.com/docs.json","name":"WebGlazer Docs","description":"WebGlazer tracks how AI engines (ChatGPT, Perplexity, Google AI Mode, Gemini and Copilot) talk about your brand. These docs explain how to set up tracking, read every dashboard metric, and connect your own AI agent through the WebGlazer MCP server.","colors":{"primary":"#0A0A0A","light":"#00BCFF","dark":"#0A0A0A"},"logo":{"light":"https://mintcdn.com/sia-webglazer/RnnQeDr4g_d8k2PR/logo/light.svg?fit=max\u0026auto=format\u0026n=RnnQeDr4g_d8k2PR\u0026q=85\u0026s=7b9e74439106ac2b023572b1cb5763c9","dark":"https://mintcdn.com/sia-webglazer/RnnQeDr4g_d8k2PR/logo/dark.svg?fit=max\u0026auto=format\u0026n=RnnQeDr4g_d8k2PR\u0026q=85\u0026s=2197d02957fc13011d75e6d396d01908","href":"https://webglazer.com/docs"},"favicon":"https://mintcdn.com/sia-webglazer/387JOkOy61DsvI23/favicon.svg?fit=max\u0026auto=format\u0026n=387JOkOy61DsvI23\u0026q=85\u0026s=ce4b5d8e811cc056e0c874611a932f17","navbar":{"links":[{"href":"https://webglazer.com/book-demo","label":"Book a demo"}],"primary":{"type":"button","label":"Open dashboard","href":"https://app.webglazer.com"}},"footer":{"socials":{"linkedin":"https://www.linkedin.com/company/webglazer"},"links":[{"header":"Product","items":[{"label":"Pricing","href":"https://webglazer.com/pricing"},{"label":"Blog","href":"https://webglazer.com/blog"},{"label":"FAQ","href":"https://webglazer.com/faq"},{"label":"AI visibility checker","href":"https://webglazer.com/tools/ai-visibility-checker"}]},{"header":"Company","items":[{"label":"Book a demo","href":"https://webglazer.com/book-demo"},{"label":"Contact support","href":"mailto:support@webglazer.com"}]},{"header":"Legal","items":[{"label":"Privacy policy","href":"https://webglazer.com/privacy"},{"label":"Terms of service","href":"https://webglazer.com/terms"}]}]},"icons":{"library":"lucide"},"contextual":{"options":["copy","view","chatgpt","claude","perplexity","mcp"],"display":"header"},"interaction":{"drilldown":false},"styling":{"latex":false},"navigation":{"pages":[]}},"deployment":{"deploymentMetadataValue":{"subdomain":"sia-webglazer","hasAudioNarration":false,"actualSubdomain":"sia-webglazer","customDomains":[],"gitSource":{"type":"github","owner":"webglazer","repo":"docs","deployBranch":"main","contentDirectory":"","isPrivate":false,"mountPath":"","label":"","_id":"6af22770dfcf815f2582024d"},"entitlements":{"AI_CHAT":{"status":"ENABLED"},"WEB_MCP":{"status":"ENABLED"},"NARRATION":{"status":"ENABLED"}},"buildId":"6af2dc791661757f0de1bb5e","clientVersion":"0.0.4094","searchFilterCounts":[{"language":"default","tag":"Documentation","count":29},{"language":"default","tag":"Dashboard","count":13},{"language":"default","tag":"AI Visibility","count":8},{"language":"default","tag":"Setup","count":6},{"language":"default","tag":"Metrics","count":5},{"language":"default","tag":"Get started","count":3},{"language":"default","tag":"Account","count":2},{"language":"default","tag":"Integrations","count":2},{"language":"default","tag":"Help center","count":1},{"language":"default","tag":"Help","count":1}]},"assistantConfig":{"enableAskAiButton":false,"enableStarterQuestions":false,"enableContextualStarterQuestions":false,"enableAskAiSearchBar":true},"basePath":"/docs","hasChatPermissions":false,"hasWebMcpPermissions":true,"toggles":[{"name":"kill-isr","enabled":true,"variant":{"name":"disabled","enabled":false,"feature_enabled":true},"impressionData":false},{"name":"custom-rbac-roles","enabled":true,"variant":{"name":"disabled","enabled":false,"feature_enabled":true},"impressionData":false},{"name":"agent-mintlify-slack","enabled":true,"variant":{"name":"disabled","enabled":false,"feature_enabled":true},"impressionData":false},{"name":"agent-integrations-settings","enabled":true,"variant":{"name":"disabled","enabled":false,"feature_enabled":true},"impressionData":false},{"name":"rbac-expansion","enabled":true,"variant":{"name":"disabled","enabled":false,"feature_enabled":true},"impressionData":false},{"name":"automations-pr-grouping","enabled":true,"variant":{"name":"disabled","enabled":false,"feature_enabled":true},"impressionData":false},{"name":"custom-prefix","enabled":true,"variant":{"name":"disabled","enabled":false,"feature_enabled":true},"impressionData":false},{"name":"analytics-v7","enabled":true,"variant":{"name":"disabled","enabled":false,"feature_enabled":true},"impressionData":false},{"name":"user-flows-analytics","enabled":true,"variant":{"name":"disabled","enabled":false,"feature_enabled":true},"impressionData":false},{"name":"no-publish-flow","enabled":true,"variant":{"name":"disabled","enabled":false,"feature_enabled":true},"impressionData":false},{"name":"workos-onboarding","enabled":true,"variant":{"name":"disabled","enabled":false,"feature_enabled":true},"impressionData":false},{"name":"llms-txt-v2","enabled":true,"variant":{"name":"disabled","enabled":false,"feature_enabled":true},"impressionData":false},{"name":"snapshot-serving-live","enabled":true,"variant":{"name":"disabled","enabled":false,"feature_enabled":true},"impressionData":false},{"name":"stripTemperatureMiddleware","enabled":true,"variant":{"name":"disabled","enabled":false,"feature_enabled":true},"impressionData":false},{"name":"support-platform-pylon-zendesk","enabled":true,"variant":{"name":"disabled","enabled":false,"feature_enabled":true},"impressionData":false},{"name":"snapshot-serving","enabled":true,"variant":{"name":"disabled","enabled":false,"feature_enabled":true},"impressionData":false},{"name":"instant-rollback","enabled":true,"variant":{"name":"disabled","enabled":false,"feature_enabled":true},"impressionData":false},{"name":"granular-notifications-server","enabled":true,"variant":{"name":"disabled","enabled":false,"feature_enabled":true},"impressionData":false},{"name":"granular-notifications","enabled":true,"variant":{"name":"disabled","enabled":false,"feature_enabled":true},"impressionData":false},{"name":"automations-fable","enabled":true,"variant":{"name":"disabled","enabled":false,"feature_enabled":true},"impressionData":false},{"name":"fixed-ai-action-pricing","enabled":true,"variant":{"name":"disabled","enabled":false,"feature_enabled":true},"impressionData":false},{"name":"automation-resolve-merge-conflict","enabled":true,"variant":{"name":"disabled","enabled":false,"feature_enabled":true},"impressionData":false},{"name":"scoped-publishing","enabled":true,"variant":{"name":"disabled","enabled":false,"feature_enabled":true},"impressionData":false},{"name":"mintql","enabled":true,"variant":{"name":"disabled","enabled":false,"feature_enabled":true},"impressionData":false},{"name":"page-level-analytics","enabled":true,"variant":{"name":"disabled","enabled":false,"feature_enabled":true},"impressionData":false},{"name":"editor-version-history-v2","enabled":true,"variant":{"name":"disabled","enabled":false,"feature_enabled":true},"impressionData":false},{"name":"billing-page-v2","enabled":true,"variant":{"name":"disabled","enabled":false,"feature_enabled":true},"impressionData":false},{"name":"full-page-search","enabled":true,"variant":{"name":"disabled","enabled":false,"feature_enabled":true},"impressionData":false},{"name":"workspace-projects","enabled":true,"variant":{"name":"disabled","enabled":false,"feature_enabled":true},"impressionData":false},{"name":"assistant-v5","enabled":true,"variant":{"name":"disabled","enabled":false,"feature_enabled":true},"impressionData":false},{"name":"fork-pr-previews","enabled":true,"variant":{"name":"disabled","enabled":false,"feature_enabled":true},"impressionData":false},{"name":"revalidation-jwt","enabled":true,"variant":{"name":"disabled","enabled":false,"feature_enabled":true},"impressionData":false},{"name":"workos-sso-scim","enabled":true,"variant":{"name":"disabled","enabled":false,"feature_enabled":true},"impressionData":false},{"name":"hobby-abuse-scan","enabled":true,"variant":{"name":"disabled","enabled":false,"feature_enabled":true},"impressionData":false},{"name":"dashboard-inbox","enabled":true,"variant":{"name":"disabled","enabled":false,"feature_enabled":true},"impressionData":false},{"name":"workos-signup","enabled":true,"variant":{"name":"disabled","enabled":false,"feature_enabled":true},"impressionData":false},{"name":"turbopuffer-dual-write","enabled":true,"variant":{"name":"disabled","enabled":false,"feature_enabled":true},"impressionData":false},{"name":"workos-enabled","enabled":true,"variant":{"name":"disabled","enabled":false,"feature_enabled":true},"impressionData":false},{"name":"approve-review-flow","enabled":true,"variant":{"name":"disabled","enabled":false,"feature_enabled":true},"impressionData":false},{"name":"editor-metadata","enabled":true,"variant":{"name":"disabled","enabled":false,"feature_enabled":true},"impressionData":false},{"name":"sso-setup-deadline-banner","enabled":true,"variant":{"name":"disabled","enabled":false,"feature_enabled":true},"impressionData":false},{"name":"turbopuffer-serve","enabled":true,"variant":{"name":"disabled","enabled":false,"feature_enabled":true},"impressionData":false},{"name":"live-agents","enabled":true,"variant":{"name":"disabled","enabled":false,"feature_enabled":true},"impressionData":false}],"googleFontsInlined":false},"customCss":[{"filePath":"style.css","content":"button[aria-label=\"Toggle assistant panel\"],.chat-assistant-floating-input,[data-assistant-bar]{display:none!important}"},{"filePath":"fonts.css","content":"/* cyrillic-ext */\n@font-face {\n font-family: 'Geist';\n font-style: normal;\n font-weight: 100 900;\n font-display: swap;\n src: url(/docs/_mintlify/assets/fonts/google/s/geist/v5/gyByhwUxId8gMEwRGFWfOw.woff2) format('woff2');\n unicode-range: U+0460-052F, U+1C80-1C8A, U+20B4, U+2DE0-2DFF, U+A640-A69F, U+FE2E-FE2F;\n}\n/* cyrillic */\n@font-face {\n font-family: 'Geist';\n font-style: normal;\n font-weight: 100 900;\n font-display: swap;\n src: url(/docs/_mintlify/assets/fonts/google/s/geist/v5/gyByhwUxId8gMEwYGFWfOw.woff2) format('woff2');\n unicode-range: U+0301, U+0400-045F, U+0490-0491, U+04B0-04B1, U+2116;\n}\n/* vietnamese */\n@font-face {\n font-family: 'Geist';\n font-style: normal;\n font-weight: 100 900;\n font-display: swap;\n src: url(/docs/_mintlify/assets/fonts/google/s/geist/v5/gyByhwUxId8gMEwTGFWfOw.woff2) format('woff2');\n unicode-range: U+0102-0103, U+0110-0111, U+0128-0129, U+0168-0169, U+01A0-01A1, U+01AF-01B0, U+0300-0301, U+0303-0304, U+0308-0309, U+0323, U+0329, U+1EA0-1EF9, U+20AB;\n}\n/* latin-ext */\n@font-face {\n font-family: 'Geist';\n font-style: normal;\n font-weight: 100 900;\n font-display: swap;\n src: url(/docs/_mintlify/assets/fonts/google/s/geist/v5/gyByhwUxId8gMEwSGFWfOw.woff2) format('woff2');\n unicode-range: U+0100-02BA, U+02BD-02C5, U+02C7-02CC, U+02CE-02D7, U+02DD-02FF, U+0304, U+0308, U+0329, U+1D00-1DBF, U+1E00-1E9F, U+1EF2-1EFF, U+2020, U+20A0-20AB, U+20AD-20C4, U+2113, U+2C60-2C7F, U+A720-A7FF;\n}\n/* latin */\n@font-face {\n font-family: 'Geist';\n font-style: normal;\n font-weight: 100 900;\n font-display: swap;\n src: url(/docs/_mintlify/assets/fonts/google/s/geist/v5/gyByhwUxId8gMEwcGFU.woff2) format('woff2');\n unicode-range: U+0000-00FF, U+0131, U+0152-0153, U+02BB-02BC, U+02C6, U+02DA, U+02DC, U+0304, U+0308, U+0329, U+2000-206F, U+20AC, U+2122, U+2191, U+2193, U+2212, U+2215, U+FEFF, U+FFFD;\n}\n:root{--font-inter: \"Geist\", -apple-system, BlinkMacSystemFont, \"Segoe UI\", \"Roboto\",\n \"Oxygen\", \"Ubuntu\", \"Cantarell\", \"Fira Sans\", \"Droid Sans\", \"Helvetica Neue\",\n sans-serif}body{font-family:var(--font-inter);font-feature-settings:normal;font-variant-numeric:normal;font-variant-ligatures:normal}.font-inter{font-family:var(--font-inter)}em,i,.italic{font-style:italic;font-synthesis:none}h1,h2,h3,h4,h5,h6,p,span,div{font-feature-settings:\"ss01\" 0, \"ss02\" 0, \"ss03\" 0;font-variant-alternates:normal}"}],"page":{"pagePath":"quickstart","slug":"/quickstart","pageMetadata":{"title":"Quickstart","description":"Set up WebGlazer from sign up to your first AI visibility results in the dashboard.","related":["/concepts","/setup/prompts-and-topics","/metrics/visibility"],"href":"/quickstart"},"description":{"compiledSource":"\"use strict\";\nconst {jsx: _jsx} = arguments[0];\nconst {useMDXComponents: _provideComponents} = arguments[0];\nfunction _createMdxContent(props) {\n const _components = {\n p: \"p\",\n ..._provideComponents(),\n ...props.components\n };\n return _jsx(_components.p, {\n children: \"Set up WebGlazer from sign up to your first AI visibility results in the dashboard.\"\n });\n}\nfunction MDXContent(props = {}) {\n const {wrapper: MDXLayout} = {\n ..._provideComponents(),\n ...props.components\n };\n return MDXLayout ? _jsx(MDXLayout, {\n ...props,\n children: _jsx(_createMdxContent, {\n ...props\n })\n }) : _createMdxContent(props);\n}\nreturn {\n default: MDXContent\n};\n","frontmatter":{},"scope":{}},"pageType":"default","mdx":{"mdxSource":{"compiledSource":"\"use strict\";const{Fragment:_Fragment,jsx:_jsx,jsxs:_jsxs}=arguments[0];const{useMDXComponents:_provideComponents}=arguments[0];function _createMdxContent(props){const _components={a:`a`,code:`code`,li:`li`,ol:`ol`,p:`p`,strong:`strong`,tbody:`tbody`,td:`td`,th:`th`,thead:`thead`,tr:`tr`,ul:`ul`,..._provideComponents(),...props.components},{Card,CardGroup,Frame,Heading,Note,OptimizedImage,Step,Steps,Table}=_components;if(!Card)_missingMdxReference(`Card`,true);if(!CardGroup)_missingMdxReference(`CardGroup`,true);if(!Frame)_missingMdxReference(`Frame`,true);if(!Heading)_missingMdxReference(`Heading`,true);if(!Note)_missingMdxReference(`Note`,true);if(!OptimizedImage)_missingMdxReference(`OptimizedImage`,true);if(!Step)_missingMdxReference(`Step`,true);if(!Steps)_missingMdxReference(`Steps`,true);if(!Table)_missingMdxReference(`Table`,true);return _jsxs(_Fragment,{children:[_jsxs(_components.p,{children:[`This guide walks you through the setup wizard at `,_jsx(_components.a,{href:`https://app.webglazer.com`,children:`app.webglazer.com`}),`, from creating your account to seeing your first results on the Overview. You need your website address and a payment card for the plan or free trial.`]}),`\n`,_jsxs(_components.p,{children:[`Your first run starts as soon as you finish setup. The engines usually answer within about four to six minutes, and your results appear on the `,_jsx(_components.strong,{children:`Overview`}),` when the run finishes. After that, your data updates once a day without you doing anything.`]}),`\n`,_jsx(Heading,{level:`2`,id:`before-you-start`,children:`Before you start`}),`\n`,_jsxs(_components.ul,{children:[`\n`,_jsxs(_components.li,{children:[`Have your website address ready, for example `,_jsx(_components.code,{children:`yourbusiness.com`}),`.`]}),`\n`,_jsx(_components.li,{children:`Know the market (country) and language your buyers search in.`}),`\n`,_jsx(_components.li,{children:`Have a few competitors in mind. WebGlazer suggests some, and you can add your own.`}),`\n`]}),`\n`,_jsx(Heading,{level:`2`,id:`set-up-tracking`,children:`Set up tracking`}),`\n`,_jsx(_components.p,{children:`The whole flow at a glance:`}),`\n`,_jsxs(Table,{children:[_jsx(_components.thead,{children:_jsxs(_components.tr,{children:[_jsx(_components.th,{children:`Stage`}),_jsx(_components.th,{children:`What happens`})]})}),_jsxs(_components.tbody,{children:[_jsxs(_components.tr,{children:[_jsx(_components.td,{children:`Create your account`}),_jsx(_components.td,{children:`Sign up with Google or with email and a password.`})]}),_jsxs(_components.tr,{children:[_jsx(_components.td,{children:`Steps 1 to 4`}),_jsx(_components.td,{children:`Project details, brand, topics and prompts.`})]}),_jsxs(_components.tr,{children:[_jsx(_components.td,{children:`Step 5`}),_jsx(_components.td,{children:`Choose a plan in Stripe.`})]}),_jsxs(_components.tr,{children:[_jsx(_components.td,{children:`After checkout`}),_jsx(_components.td,{children:`Pick your engines and invite your team.`})]}),_jsxs(_components.tr,{children:[_jsx(_components.td,{children:`First run`}),_jsx(_components.td,{children:`About 4 to 6 minutes, then your results are on the Overview.`})]})]})]}),`\n`,_jsxs(Steps,{children:[_jsx(Step,{title:`Create your account`,children:_jsxs(_components.p,{children:[`Go to `,_jsx(_components.a,{href:`https://app.webglazer.com`,children:`app.webglazer.com`}),` and choose `,_jsx(_components.strong,{children:`Continue with Google`}),`, or enter your email and a password and click `,_jsx(_components.strong,{children:`Create account`}),`.`]})}),_jsxs(Step,{title:`Choose who you are tracking`,children:[_jsxs(_components.p,{children:[`On `,_jsx(_components.strong,{children:`Who are you tracking?`}),`, pick `,_jsx(_components.strong,{children:`My own brand`}),` to track your own company, or `,_jsx(_components.strong,{children:`My clients`}),` if you are an agency.`]}),_jsxs(_components.p,{children:[`This guide follows `,_jsx(_components.strong,{children:`My own brand`}),`. Agencies first fill in `,_jsx(_components.strong,{children:`Your agency`}),` and then add a first `,_jsx(_components.strong,{children:`Client project`}),`. See `,_jsx(_components.a,{href:`/setup/agencies`,children:`Agencies`}),`.`]})]}),_jsxs(Step,{title:`Step 1: Project details`,children:[_jsxs(_components.p,{children:[`The `,_jsx(_components.strong,{children:`Project details`}),` step opens a screen headed `,_jsx(_components.strong,{children:`Brand setup`}),`. Fill in:`]}),_jsxs(_components.ul,{children:[`\n`,_jsxs(_components.li,{children:[_jsx(_components.strong,{children:`Website URL`}),`: your main website.`]}),`\n`,_jsxs(_components.li,{children:[_jsx(_components.strong,{children:`Brand name`}),`: the name AI answers should use for you.`]}),`\n`,_jsxs(_components.li,{children:[_jsx(_components.strong,{children:`Market`}),` and `,_jsx(_components.strong,{children:`Language`}),`: where your buyers are and the language they search in. WebGlazer may suggest these from your website. Click `,_jsx(_components.strong,{children:`Use this`}),` to accept the suggestion.`]}),`\n`]}),_jsxs(_components.p,{children:[`Click `,_jsx(_components.strong,{children:`Next`}),`. WebGlazer creates your project and starts reading your website.`]}),_jsx(Frame,{caption:`Illustration with sample data`,children:_jsx(OptimizedImage,{src:`https://mintcdn.com/sia-webglazer/xTXVRghP1Bd03NXs/images/dashboard/mock-onboarding-project-details.webp?fit=max\u0026auto=format\u0026n=xTXVRghP1Bd03NXs\u0026q=85\u0026s=15df272f4ec32e7b4db9c0fffbcd5372`,alt:`Setup wizard step 1, Brand setup, with Website URL, Brand name, Market and Language`,\"data-og-width\":`1600`,width:`1600`,\"data-og-height\":`1006`,height:`1006`,\"data-path\":`images/dashboard/mock-onboarding-project-details.webp`,\"data-optimize\":`true`,\"data-opv\":`3`,srcset:`https://mintcdn.com/sia-webglazer/xTXVRghP1Bd03NXs/images/dashboard/mock-onboarding-project-details.webp?w=280\u0026fit=max\u0026auto=format\u0026n=xTXVRghP1Bd03NXs\u0026q=85\u0026s=2ccabf941943addbfc7a20478d3a51ab 280w, https://mintcdn.com/sia-webglazer/xTXVRghP1Bd03NXs/images/dashboard/mock-onboarding-project-details.webp?w=560\u0026fit=max\u0026auto=format\u0026n=xTXVRghP1Bd03NXs\u0026q=85\u0026s=1b2b023ead6e3270612366aa837f2caa 560w, https://mintcdn.com/sia-webglazer/xTXVRghP1Bd03NXs/images/dashboard/mock-onboarding-project-details.webp?w=840\u0026fit=max\u0026auto=format\u0026n=xTXVRghP1Bd03NXs\u0026q=85\u0026s=e6f49cfd355c42d259725125812ffea0 840w, https://mintcdn.com/sia-webglazer/xTXVRghP1Bd03NXs/images/dashboard/mock-onboarding-project-details.webp?w=1100\u0026fit=max\u0026auto=format\u0026n=xTXVRghP1Bd03NXs\u0026q=85\u0026s=d29eb149fba68173dfb20221fd90073f 1100w, https://mintcdn.com/sia-webglazer/xTXVRghP1Bd03NXs/images/dashboard/mock-onboarding-project-details.webp?w=1650\u0026fit=max\u0026auto=format\u0026n=xTXVRghP1Bd03NXs\u0026q=85\u0026s=148b7d61ea2508abc4137eebe6fd6b12 1650w, https://mintcdn.com/sia-webglazer/xTXVRghP1Bd03NXs/images/dashboard/mock-onboarding-project-details.webp?w=2500\u0026fit=max\u0026auto=format\u0026n=xTXVRghP1Bd03NXs\u0026q=85\u0026s=7ac1095581c0782775cbfda7a02f585e 2500w`})})]}),_jsxs(Step,{title:`Step 2: Brand understanding`,children:[_jsxs(_components.p,{children:[`WebGlazer reads your site and fills in your `,_jsx(_components.strong,{children:`Brand profile`}),`. Check and edit each part:`]}),_jsxs(_components.ul,{children:[`\n`,_jsxs(_components.li,{children:[_jsx(_components.strong,{children:`Description`}),` and `,_jsx(_components.strong,{children:`Category`})]}),`\n`,_jsxs(_components.li,{children:[_jsx(_components.strong,{children:`What you sell`}),`: your products or services.`]}),`\n`,_jsxs(_components.li,{children:[_jsx(_components.strong,{children:`Who you sell to`}),`: your buyers.`]}),`\n`,_jsxs(_components.li,{children:[_jsx(_components.strong,{children:`Who you compete with`}),`: suggested competitors. Remove any that are wrong, or use `,_jsx(_components.strong,{children:`Add a competitor`}),`.`]}),`\n`,_jsxs(_components.li,{children:[_jsx(_components.strong,{children:`Question mix`}),`: how much weight to give each buyer stage: `,_jsx(_components.strong,{children:`Learning`}),`, `,_jsx(_components.strong,{children:`Comparing`}),` and `,_jsx(_components.strong,{children:`Buying`}),`. The `,_jsx(_components.strong,{children:`About you`}),` switch adds questions that name your brand.`]}),`\n`]}),_jsxs(_components.p,{children:[`Click `,_jsx(_components.strong,{children:`Next`}),`. Your changes save as you go.`]})]}),_jsxs(Step,{title:`Step 3: Topics`,children:[_jsxs(_components.p,{children:[`On `,_jsx(_components.strong,{children:`Review topics`}),`, pick the subjects you want to watch in AI answers. The counter next to `,_jsx(_components.strong,{children:`Select topics`}),` shows how many you can keep. Edit a topic name, delete one, or add your own with `,_jsx(_components.strong,{children:`New topic`}),`.`]}),_jsxs(_components.p,{children:[`Click `,_jsx(_components.strong,{children:`Next`}),`.`]})]}),_jsxs(Step,{title:`Step 4: Prompts`,children:[_jsxs(_components.p,{children:[`On `,_jsx(_components.strong,{children:`Review prompts`}),`, check the questions WebGlazer will ask the AI engines, grouped by topic. Edit or delete any prompt, or type your own in `,_jsx(_components.strong,{children:`Add a custom prompt`}),`. The counter next to `,_jsx(_components.strong,{children:`Select prompts`}),` shows how many you keep against your limit.`]}),_jsxs(_components.p,{children:[`Click `,_jsx(_components.strong,{children:`Looks good`}),`.`]}),_jsxs(_components.p,{children:[`Not sure which prompts to keep? Keep the ones a buyer would really ask, and leave your brand name out of most of them. See `,_jsx(_components.a,{href:`/setup/prompts-and-topics#write-prompts-that-measure-something-useful`,children:`Prompts and topics`}),`.`]})]}),_jsxs(Step,{title:`Step 5: Review and choose a plan`,children:[_jsxs(_components.p,{children:[`You see a summary: `,_jsx(_components.strong,{children:`Setup complete`}),`, how AI describes you today, example questions, and the competitors you are `,_jsx(_components.strong,{children:`Benchmarked against`}),`. Click `,_jsx(_components.strong,{children:`See my plan`}),`.`]}),_jsxs(_components.p,{children:[`Pick a plan. You go to Stripe to enter your card. If your account can get the free trial, the Basic plan shows `,_jsx(_components.strong,{children:`Start 7-day free trial`}),`. See `,_jsx(_components.a,{href:`/account/plans-and-billing`,children:`Plans and billing`}),`.`]}),_jsx(_components.p,{children:`When checkout is done, Stripe sends you back to WebGlazer to finish the last steps below.`})]}),_jsxs(Step,{title:`Pick your AI engines`,children:[_jsxs(_components.p,{children:[`Back in WebGlazer, `,_jsx(_components.strong,{children:`Welcome to WebGlazer`}),` shows the AI engines. On Standard and Advanced it says “All 5 AI models are in your plan” and every engine is on. On Basic it says “Pick up to 3 of the 5 AI models”. On an agency plan you pick 1 to 5, and a line shows how many daily credits your choice uses. Click `,_jsx(_components.strong,{children:`Continue`}),`.`]}),_jsxs(_components.p,{children:[`You can change engines later. See `,_jsx(_components.a,{href:`/setup/engines-and-schedule`,children:`Engines and schedule`}),`.`]})]}),_jsxs(Step,{title:`Answer a few questions and invite your team`,children:[_jsxs(_components.p,{children:[`Answer the short questions about your role and goals, then `,_jsx(_components.strong,{children:`How did you hear about WebGlazer?`}),`.`]}),_jsxs(_components.p,{children:[`On `,_jsx(_components.strong,{children:`AI visibility is a team effort`}),`, enter teammates’ emails, pick a role, and click `,_jsx(_components.strong,{children:`Send invite`}),`, or click `,_jsx(_components.strong,{children:`Skip for now`}),`. The roles are `,_jsx(_components.strong,{children:`Company Admin`}),`, Member (shown here as `,_jsx(_components.strong,{children:`Company Member`}),`) and `,_jsx(_components.strong,{children:`Viewer`}),`. See `,_jsx(_components.a,{href:`/setup/team`,children:`Team`}),`.`]}),_jsxs(_components.p,{children:[`On `,_jsx(_components.strong,{children:`Setup complete. You’re ready to go.`}),`, click `,_jsx(_components.strong,{children:`Explore insights`}),`.`]})]}),_jsx(Step,{title:`Watch your first run`,children:_jsxs(_components.p,{children:[`Your first run starts now. The `,_jsx(_components.strong,{children:`Run Progress`}),` popup opens over the Overview with one ring per AI engine. Each ring fills as answers come in. You can close the popup; the run keeps going.`]})}),_jsxs(Step,{title:`Read your results on the Overview`,children:[_jsxs(_components.p,{children:[`When the run finishes, the `,_jsx(_components.strong,{children:`Overview`}),` shows `,_jsx(_components.strong,{children:`Visibility Over Time`}),` and the `,_jsx(_components.strong,{children:`Rankings`}),` table, which compares your brand with your competitors on visibility, sentiment and mention order.`]}),_jsx(Frame,{caption:`Illustration with sample data`,children:_jsx(OptimizedImage,{src:`https://mintcdn.com/sia-webglazer/xTXVRghP1Bd03NXs/images/dashboard/mock-rankings.webp?fit=max\u0026auto=format\u0026n=xTXVRghP1Bd03NXs\u0026q=85\u0026s=3c3667426ee4999b5d95971ef914aa3d`,alt:`Rankings table on the Overview after the first run`,\"data-og-width\":`1600`,width:`1600`,\"data-og-height\":`685`,height:`685`,\"data-path\":`images/dashboard/mock-rankings.webp`,\"data-optimize\":`true`,\"data-opv\":`3`,srcset:`https://mintcdn.com/sia-webglazer/xTXVRghP1Bd03NXs/images/dashboard/mock-rankings.webp?w=280\u0026fit=max\u0026auto=format\u0026n=xTXVRghP1Bd03NXs\u0026q=85\u0026s=40484f539d7ecc87313cc99235a3ecab 280w, https://mintcdn.com/sia-webglazer/xTXVRghP1Bd03NXs/images/dashboard/mock-rankings.webp?w=560\u0026fit=max\u0026auto=format\u0026n=xTXVRghP1Bd03NXs\u0026q=85\u0026s=832603ee298db7c23a4e570e71f8098d 560w, https://mintcdn.com/sia-webglazer/xTXVRghP1Bd03NXs/images/dashboard/mock-rankings.webp?w=840\u0026fit=max\u0026auto=format\u0026n=xTXVRghP1Bd03NXs\u0026q=85\u0026s=016d2449fe7c99c276c5f66058ee1273 840w, https://mintcdn.com/sia-webglazer/xTXVRghP1Bd03NXs/images/dashboard/mock-rankings.webp?w=1100\u0026fit=max\u0026auto=format\u0026n=xTXVRghP1Bd03NXs\u0026q=85\u0026s=65dbc320cae4f05b7194a20035cbd61d 1100w, https://mintcdn.com/sia-webglazer/xTXVRghP1Bd03NXs/images/dashboard/mock-rankings.webp?w=1650\u0026fit=max\u0026auto=format\u0026n=xTXVRghP1Bd03NXs\u0026q=85\u0026s=dce8e6bbfa40a049f4e940006b56ffd2 1650w, https://mintcdn.com/sia-webglazer/xTXVRghP1Bd03NXs/images/dashboard/mock-rankings.webp?w=2500\u0026fit=max\u0026auto=format\u0026n=xTXVRghP1Bd03NXs\u0026q=85\u0026s=9e939986dc684853685ca42d525f51b7 2500w`})}),_jsxs(_components.p,{children:[`See `,_jsx(_components.a,{href:`/dashboard/overview`,children:`Overview`}),` for how to read each part.`]})]})]}),`\n`,_jsx(Note,{children:_jsx(_components.p,{children:`After the first run, WebGlazer asks the AI engines your prompts once a day for each brand and records the answers. New data shows up after each daily run. You do not need to do anything to keep tracking.`})}),`\n`,_jsx(Heading,{level:`2`,id:`what-to-do-next`,children:`What to do next`}),`\n`,_jsxs(_components.ol,{children:[`\n`,_jsxs(_components.li,{children:[`Go to `,_jsx(_components.strong,{children:`Settings`}),` > `,_jsx(_components.strong,{children:`Brands`}),` and accept the competitors you want to compare with from `,_jsx(_components.strong,{children:`Brand suggestions`}),`. Only your own brand and the competitors you track count in `,_jsx(_components.strong,{children:`Rankings`}),`, Share of Voice and the other competitor numbers. A brand AI names that you have not accepted is left out. See `,_jsx(_components.a,{href:`/setup/competitors`,children:`Competitors`}),`.`]}),`\n`,_jsxs(_components.li,{children:[`Open `,_jsx(_components.strong,{children:`AI Visibility`}),` > `,_jsx(_components.strong,{children:`Prompts`}),` to see each answer and where your brand appears.`]}),`\n`,_jsxs(_components.li,{children:[`Invite colleagues from `,_jsx(_components.strong,{children:`Settings`}),` > `,_jsx(_components.strong,{children:`Members`}),`.`]}),`\n`]}),`\n`,_jsx(Heading,{level:`2`,id:`next-steps`,children:`Next steps`}),`\n`,_jsxs(CardGroup,{cols:1,children:[_jsx(Card,{title:`Core concepts`,icon:`book-open`,href:`/concepts`,horizontal:true,children:_jsx(_components.p,{children:`Brands, prompts, topics, engines, runs and credits in plain words.`})}),_jsx(Card,{title:`Write better prompts`,icon:`message-square-text`,href:`/setup/prompts-and-topics`,horizontal:true,children:_jsx(_components.p,{children:`Pick the prompts and topics that measure something useful.`})}),_jsx(Card,{title:`Read the Overview`,icon:`layout-dashboard`,href:`/dashboard/overview`,horizontal:true,children:_jsx(_components.p,{children:`Visibility Over Time and Rankings, part by part.`})}),_jsx(Card,{title:`Connect your AI agent`,icon:`plug`,href:`/integrations/mcp`,horizontal:true,children:_jsx(_components.p,{children:`Let Claude, Cursor or another MCP client read your WebGlazer data.`})})]})]})}function MDXContent(props={}){const{wrapper:MDXLayout}={..._provideComponents(),...props.components};return MDXLayout?_jsx(MDXLayout,{...props,children:_jsx(_createMdxContent,{...props})}):_createMdxContent(props)}return{default:MDXContent};function _missingMdxReference(id,component){throw new Error(`Expected `+(component?`component`:`object`)+\" `\"+id+\"` to be defined: you likely forgot to import, pass, or provide it.\")}","frontmatter":{},"scope":{"config":{},"pageMetadata":{"title":"Quickstart","description":"Set up WebGlazer from sign up to your first AI visibility results in the dashboard.","related":["/concepts","/setup/prompts-and-topics","/metrics/visibility"],"href":"/quickstart"}}},"mdxSourceWithNoJs":null},"mdxExtracts":{"tableOfContents":[{"title":"Before you start","slug":"before-you-start","depth":2,"children":[]},{"title":"Set up tracking","slug":"set-up-tracking","depth":2,"children":[]},{"title":"What to do next","slug":"what-to-do-next","depth":2,"children":[]},{"title":"Next steps","slug":"next-steps","depth":2,"children":[]}],"codeExamples":{}},"jsLinks":[],"subdomain":"sia-webglazer","siteName":"WebGlazer Docs","title":"Quickstart - WebGlazer Docs","relatedPages":[{"title":"Core concepts","link":"/concepts"},{"title":"Prompts and topics","link":"/setup/prompts-and-topics"},{"title":"Visibility","link":"/metrics/visibility"}],"relatedPagesConfig":{"enabled":true,"limit":3,"mode":"automatic"},"navMaps":{"firstHrefInVersion":{},"firstHrefInLanguage":{}},"lastModified":"2026-11-09T22:01:09.139Z","originalFileLocation":"quickstart.mdx"},"headHtml":"\u003cscript data-mint-head>(function(){var d=document.documentElement,p=null;if(!p){try{p=localStorage.getItem(\"isDarkMode\")}catch(e){}if(p==='true')p='dark';else if(p==='false')p='light';if(p!=='light'\u0026\u0026p!=='dark'\u0026\u0026p!=='system')p=\"system\"}var r=p==='system'?(matchMedia(\"(prefers-color-scheme: dark)\").matches?'dark':'light'):p;d.classList.remove(r==='dark'?'light':'dark');d.classList.add(r);d.setAttribute(\"data-theme-preference\",p)})();\u003c/script>\u003cmeta data-mint-head name=\"description\" content=\"Set up WebGlazer from sign up to your first AI visibility results in the dashboard.\">\u003cmeta data-mint-head name=\"application-name\" content=\"WebGlazer Docs\">\u003cmeta data-mint-head name=\"generator\" content=\"Mintlify\">\u003clink data-mint-head rel=\"icon\" type=\"image/png\" sizes=\"192x192\" href=\"/docs/mintlify-assets/_mintlify/favicons/sia-webglazer/HtK8XTxaAmTLMW0r/_generated/favicon/android-chrome-192x192.png\" media=\"(prefers-color-scheme: light)\">\u003clink data-mint-head rel=\"apple-touch-icon\" type=\"image/png\" sizes=\"180x180\" href=\"/docs/mintlify-assets/_mintlify/favicons/sia-webglazer/HtK8XTxaAmTLMW0r/_generated/favicon/apple-touch-icon.png\">\u003clink data-mint-head rel=\"icon\" type=\"image/png\" sizes=\"16x16\" href=\"/docs/mintlify-assets/_mintlify/favicons/sia-webglazer/HtK8XTxaAmTLMW0r/_generated/favicon/favicon-16x16.png\" media=\"(prefers-color-scheme: light)\">\u003clink data-mint-head rel=\"icon\" type=\"image/png\" sizes=\"32x32\" href=\"/docs/mintlify-assets/_mintlify/favicons/sia-webglazer/HtK8XTxaAmTLMW0r/_generated/favicon/favicon-32x32.png\" media=\"(prefers-color-scheme: light)\">\u003clink data-mint-head rel=\"shortcut icon\" type=\"image/x-icon\" href=\"/docs/mintlify-assets/_mintlify/favicons/sia-webglazer/HtK8XTxaAmTLMW0r/_generated/favicon/favicon.ico\" media=\"(prefers-color-scheme: light)\">\u003clink data-mint-head rel=\"icon\" type=\"image/png\" sizes=\"192x192\" href=\"/docs/mintlify-assets/_mintlify/favicons/sia-webglazer/HtK8XTxaAmTLMW0r/_generated/favicon-dark/android-chrome-192x192.png\" media=\"(prefers-color-scheme: dark)\">\u003clink data-mint-head rel=\"icon\" type=\"image/png\" sizes=\"16x16\" href=\"/docs/mintlify-assets/_mintlify/favicons/sia-webglazer/HtK8XTxaAmTLMW0r/_generated/favicon-dark/favicon-16x16.png\" media=\"(prefers-color-scheme: dark)\">\u003clink data-mint-head rel=\"icon\" type=\"image/png\" sizes=\"32x32\" href=\"/docs/mintlify-assets/_mintlify/favicons/sia-webglazer/HtK8XTxaAmTLMW0r/_generated/favicon-dark/favicon-32x32.png\" media=\"(prefers-color-scheme: dark)\">\u003clink data-mint-head rel=\"shortcut icon\" type=\"image/x-icon\" href=\"/docs/mintlify-assets/_mintlify/favicons/sia-webglazer/HtK8XTxaAmTLMW0r/_generated/favicon-dark/favicon.ico\" media=\"(prefers-color-scheme: dark)\">\u003cmeta data-mint-head property=\"og:title\" content=\"Quickstart - WebGlazer Docs\">\u003cmeta data-mint-head property=\"og:description\" content=\"Set up WebGlazer from sign up to your first AI visibility results in the dashboard.\">\u003cmeta data-mint-head property=\"og:site_name\" content=\"WebGlazer Docs\">\u003cmeta data-mint-head property=\"og:url\" content=\"https://webglazer.com/docs/quickstart\">\u003cmeta data-mint-head property=\"og:type\" content=\"website\">\u003cmeta data-mint-head property=\"og:image\" content=\"https://sia-webglazer.mintlify.site/docs/_mintlify/api/og/v2?division=Get+started\u0026amp;title=Quickstart\u0026amp;description=Set+up+WebGlazer+from+sign+up+to+your+first+AI+visibility+results+in+the+dashboard.\u0026amp;theme=932e42ac150f552e07f110a6\u0026amp;signature=6c11b90c477362e971f93e64df1d9880ce2d76bc787b311691bb9b4f30c79a40\">\u003cmeta data-mint-head property=\"og:image:width\" content=\"1200\">\u003cmeta data-mint-head property=\"og:image:height\" content=\"630\">\u003cmeta data-mint-head name=\"twitter:card\" content=\"summary_large_image\">\u003cmeta data-mint-head name=\"twitter:title\" content=\"Quickstart - WebGlazer Docs\">\u003cmeta data-mint-head name=\"twitter:description\" content=\"Set up WebGlazer from sign up to your first AI visibility results in the dashboard.\">\u003cmeta data-mint-head name=\"twitter:image\" content=\"https://sia-webglazer.mintlify.site/docs/_mintlify/api/og/v2?division=Get+started\u0026amp;title=Quickstart\u0026amp;description=Set+up+WebGlazer+from+sign+up+to+your+first+AI+visibility+results+in+the+dashboard.\u0026amp;theme=932e42ac150f552e07f110a6\u0026amp;signature=6c11b90c477362e971f93e64df1d9880ce2d76bc787b311691bb9b4f30c79a40\">\u003cmeta data-mint-head name=\"twitter:image:width\" content=\"1200\">\u003cmeta data-mint-head name=\"twitter:image:height\" content=\"630\">\u003cmeta data-mint-head name=\"msapplication-config\" content=\"/docs/mintlify-assets/_mintlify/favicons/sia-webglazer/HtK8XTxaAmTLMW0r/_generated/favicon/browserconfig.xml\">\u003cmeta data-mint-head name=\"apple-mobile-web-app-title\" content=\"WebGlazer Docs\">\u003cmeta data-mint-head name=\"msapplication-TileColor\" content=\"#0A0A0A\">\u003clink data-mint-head rel=\"canonical\" href=\"https://webglazer.com/docs/quickstart\">\u003clink data-mint-head rel=\"alternate\" type=\"application/xml\" href=\"/docs/sitemap.xml\">\u003clink data-mint-head rel=\"alternate\" type=\"text/markdown\" href=\"/docs/quickstart.md\">\u003cscript data-mint-head type=\"application/ld+json\">{\"@context\":\"https://schema.org\",\"@graph\":[{\"@type\":\"Organization\",\"@id\":\"https://webglazer.com/#organization\",\"name\":\"WebGlazer Docs\",\"url\":\"https://webglazer.com\",\"logo\":{\"@type\":\"ImageObject\",\"url\":\"https://mintcdn.com/sia-webglazer/RnnQeDr4g_d8k2PR/logo/light.svg?fit=max\u0026auto=format\u0026n=RnnQeDr4g_d8k2PR\u0026q=85\u0026s=7b9e74439106ac2b023572b1cb5763c9\"}},{\"@type\":\"WebSite\",\"@id\":\"https://webglazer.com/docs#website\",\"name\":\"WebGlazer Docs\",\"url\":\"https://webglazer.com/docs\",\"publisher\":{\"@id\":\"https://webglazer.com/#organization\"}},{\"@type\":\"WebPage\",\"@id\":\"https://webglazer.com/docs/quickstart#webpage\",\"url\":\"https://webglazer.com/docs/quickstart\",\"name\":\"Quickstart\",\"description\":\"Set up WebGlazer from sign up to your first AI visibility results in the dashboard.\",\"dateModified\":\"2026-11-09T22:01:09.139Z\",\"isPartOf\":{\"@id\":\"https://webglazer.com/docs#website\"},\"breadcrumb\":{\"@id\":\"https://webglazer.com/docs/quickstart#breadcrumb\"}},{\"@type\":\"BreadcrumbList\",\"@id\":\"https://webglazer.com/docs/quickstart#breadcrumb\",\"itemListElement\":[{\"@type\":\"ListItem\",\"position\":1,\"name\":\"Get started\",\"item\":\"https://webglazer.com/docs/index\"},{\"@type\":\"ListItem\",\"position\":2,\"name\":\"Quickstart\",\"item\":\"https://webglazer.com/docs/quickstart\"}]},{\"@type\":[\"Article\",\"TechArticle\"],\"@id\":\"https://webglazer.com/docs/quickstart#article\",\"headline\":\"Quickstart\",\"name\":\"Quickstart\",\"description\":\"Set up WebGlazer from sign up to your first AI visibility results in the dashboard.\",\"url\":\"https://webglazer.com/docs/quickstart\",\"mainEntityOfPage\":{\"@id\":\"https://webglazer.com/docs/quickstart#webpage\"},\"dateModified\":\"2026-11-09T22:01:09.139Z\",\"publisher\":{\"@id\":\"https://webglazer.com/#organization\"},\"isPartOf\":{\"@id\":\"https://webglazer.com/docs#website\"}}]}\u003c/script>\u003cscript data-mint-head type=\"application/ld+json\">{\"@context\":\"https://schema.org\",\"@type\":\"WebSite\",\"name\":\"WebGlazer Docs\",\"creator\":{\"@type\":\"Organization\",\"name\":\"Mintlify\",\"url\":\"https://mintlify.com\"}}\u003c/script>","siteName":"WebGlazer Docs","nav":{"global":null,"tabs":[{"tab":"Documentation","groups":[{"group":"Get started","pages":[{"title":"WebGlazer docs","description":"What WebGlazer is, which AI engines it tracks, and where to start in these docs.","mode":"frame","icon":"house","href":""},{"title":"Quickstart","href":"/quickstart"},{"title":"Core concepts","description":"Plain definitions of brand, project, prompt, topic, AI engine, run, competitor and credits in WebGlazer.","href":"/concepts"}]},{"group":"Metrics","pages":[{"title":"Visibility","href":"/metrics/visibility"},{"title":"Share of Voice","href":"/metrics/share-of-voice"},{"title":"Mention order","href":"/metrics/mention-order"},{"title":"Sentiment","href":"/metrics/sentiment"},{"title":"Citations","href":"/metrics/citations"}]},{"group":"Dashboard","pages":[{"title":"Overview","href":"/dashboard/overview"},{"group":"AI Visibility","pages":[{"title":"Visibility tab","href":"/dashboard/visibility"},{"title":"Prompts tab","href":"/dashboard/prompts"},{"title":"Topics tab","href":"/dashboard/topics"},{"title":"Platforms tab","href":"/dashboard/platforms"},{"title":"Sentiment tab","href":"/dashboard/sentiment"},{"title":"Citations tab","href":"/dashboard/citations"},{"title":"Query Fanouts","href":"/dashboard/fan-out"},{"title":"Opportunities tab","href":"/dashboard/opportunities"}]},{"title":"Products","href":"/dashboard/products"},{"title":"To-do list","href":"/dashboard/todo"},{"title":"Reports","href":"/dashboard/reports"},{"title":"Search Console","href":"/dashboard/search-console"}]},{"group":"Setup","pages":[{"title":"Prompts and topics","href":"/setup/prompts-and-topics"},{"title":"Competitors","href":"/setup/competitors"},{"title":"Engines and schedule","href":"/setup/engines-and-schedule"},{"title":"Multiple brands","href":"/setup/brands"},{"title":"Team","href":"/setup/team"},{"title":"Agency accounts","href":"/setup/agencies"}]},{"group":"Account","pages":[{"title":"Plans and billing","href":"/account/plans-and-billing"},{"title":"Settings","href":"/account/settings"}]}]},{"tab":"Integrations","pages":[{"title":"Integrations","href":"/integrations/mcp"}]},{"tab":"Help center","pages":[{"title":"Help center","href":"/faq"}]}]},"basePath":"","title":"Quickstart - WebGlazer Docs","buildId":"dpl_3pZeXn3XukjzFRgAX73A7GNDfRJ1","deploymentId":"dpl_3pZeXn3XukjzFRgAX73A7GNDfRJ1","dynamics":["07c022d89b","a74be98ba7"],"chunks":["Frame-DM_qMxGl.js","DynamicMarkdown-C91yhnNP.js","zoom-image-lightbox-g3ZzIKzc.js","lightbox-handle-r17bVUz3.js"]}