

Connection details
Before you start
- A WebGlazer account with at least one brand.
- An active subscription on the brands you want the agent to read. A brand whose subscription has ended is refused.
- An AI client that supports MCP. In Claude, custom connectors work on every plan, but a Free plan can add only one custom connector.
Two ways to connect
Sign in from your client (OAuth). This is the recommended way. You paste the server URL into your client, your browser opens a WebGlazer approval screen, and you click Allow. There is no token to copy or keep safe. Use this for Claude.ai, Claude Desktop and Claude Code. Paste a token. For clients that cannot sign in, such as Cursor. You generate a token in WebGlazer and add it to your client as anAuthorization: Bearer header.
Both kinds of connection can read every brand you have access to and update the status of items on your To-do list.
What you see on the approval screen
When your client sends you to WebGlazer, you land onapp.webglazer.com/oauth/consent.
- If you are not signed in, the screen says Connect your AI client to WebGlazer. Click Continue with Google, or Use email instead.
- The screen then asks Connect [client name]? If WebGlazer could confirm where the client comes from, it shows the client as verified with its web address. If it could not, it warns that the name is unverified, because anyone who registers a client can pick any name.
- It shows where your tokens will be sent (the client’s web address).
- It lists what the client is asking for: Read your visibility data, prompts, citations and sentiment and Update the status of items on your To Do list (the screen’s wording for the To-do list).
- It lists your brands under This connection can read every brand you have access to:. You do not pick a brand. Approving connects your whole account, and the connection covers every brand on that list.
- Click Allow to connect, or Deny to cancel.
Generate a token
You only need a token for clients that cannot sign in.Open Your AI agent
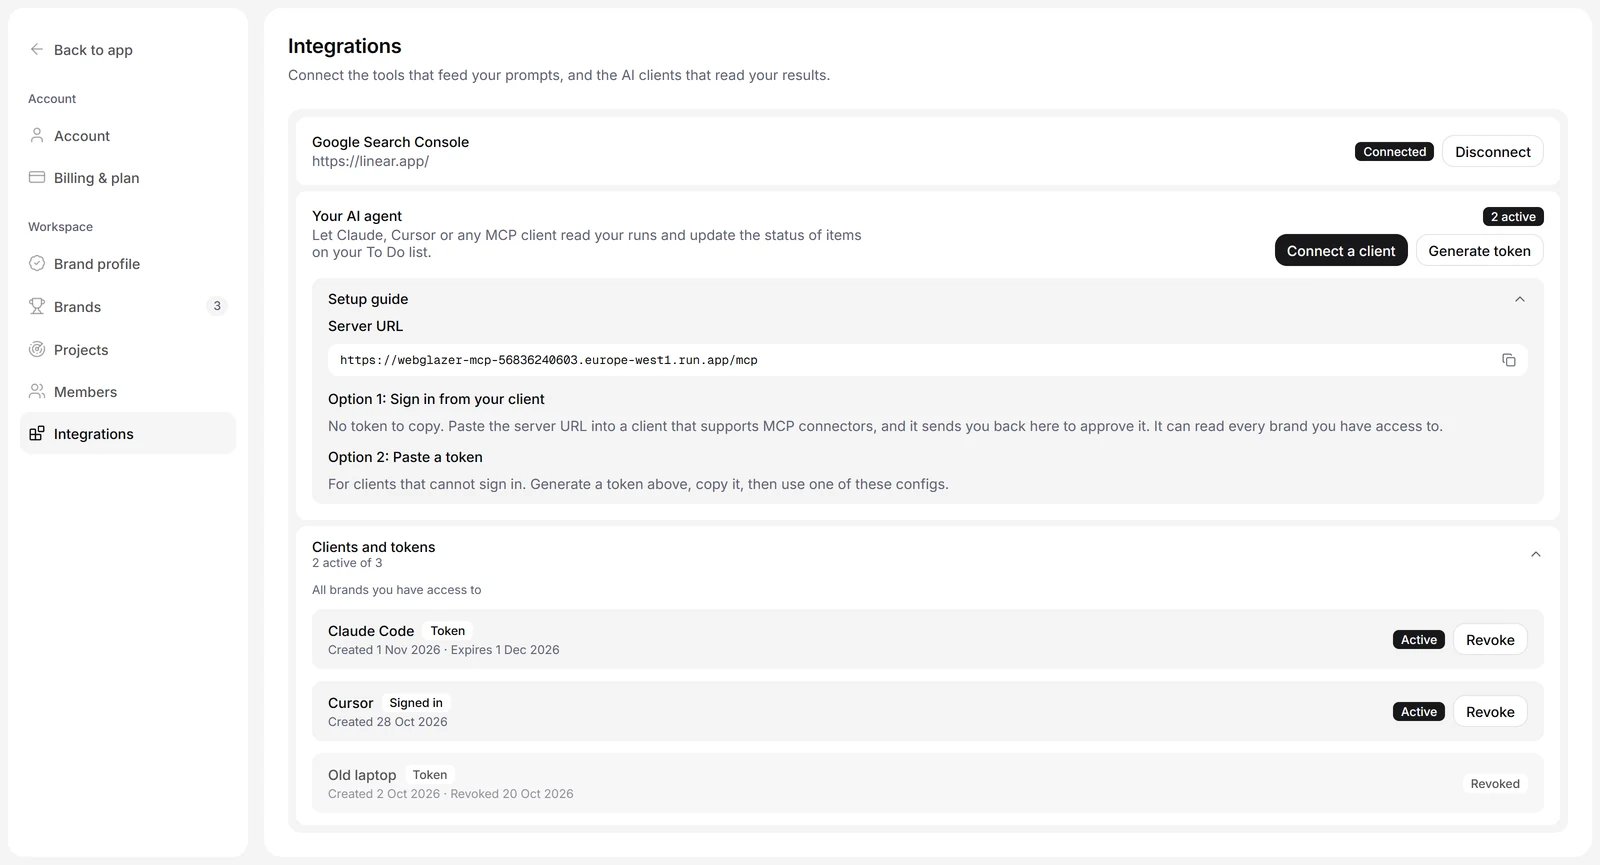
Illustration with sample data
Generate the token
Copy it now
Add it to your client
Connect your client
- Claude.ai and Claude Desktop
- Claude Code
- Cursor
- Other clients
Add a custom connector
Enter the server details
Choose how to sign in
Approve in WebGlazer
Turn it on in a chat
Check that it works
Ask your agent:“List my WebGlazer brands.”The agent calls
list_projects and shows each brand with its name, domain and your role. Then ask:
“Show me the latest runs for [brand].”If both come back, you are connected.
Example prompts
- “How did our AI visibility change week by week over the last three months?”
- “Which sources does AI cite most when it answers our prompts? Are any of them sites where we are not mentioned?”
- “How does AI describe our brand? Summarize the sentiment for the latest run.”
- “Show me what each engine answered for the prompt ‘best project management tool for agencies’.”
- “Which prompts have the lowest visibility in the last run?”
- “What is on our To-do list? Pick the three items that affect the most prompts and mark them as todo.”
- “Compare our visibility in Google AI Mode and ChatGPT for the last 30 days.”
- “Which of our products are most visible in ChatGPT?”
- “Which competitor products show up in the same answers as our best seller?”
- “Compare visibility across all my brands for the latest run.”
Tools
The server has 15 tools. All of them read data exceptmark_opportunity, which changes the status of an item on your To-do list.
Every tool except list_projects takes a project_id: the brand to read, as list_projects returns it. Your agent handles this for you; you only need to name the brand in your question.
A run is one day’s set of AI answers for a brand. Some tools read one run, picked from list_runs. See Core concepts.
Period and filters
Many tools accept the same optional period and filters:date_fromanddate_to: the first and last day, as YYYY-MM-DD. Send both or neither.all_time:truereads the dashboard’s All time period. It cannot be combined with dates.topics,intentsandmodels: keep only these topics, intents or engines. Get the valid values fromget_filter_options.today: your local date, as YYYY-MM-DD. With no dates, the tool reads the period the dashboard opens on, andtodaymakes that period match the one you see in the dashboard.
models but not topics or intents. Their scope is shopping (the default: only answers that showed product cards) or all (every answer). Product tools work only on plans that include Products: Standard, Advanced, agency plans, and the Basic free trial. On a paid Basic plan they return “Product visibility is not included in this project’s WebGlazer plan, so there is no product data to show.” With no store connected, list_products returns an empty list and get_product says the project has no Shopify store connected. Connecting or disconnecting a store happens in the dashboard. See Products and Plans and billing.
Read and write access
Every tool reads data exceptmark_opportunity. It sets an item to todo (picked to work on), done or dismissed, or reopens it with open. The change shows on your own To-do list in the dashboard. To-do statuses are personal, so teammates keep their own. It only writes to the brand you name. Every role, Viewers included, can change their own statuses.
A token you generate in WebGlazer always includes write access. A client that signs in gets the permissions you see on the approval screen. If the screen did not include Update the status of items on your To Do list, the connection can still read everything, but mark_opportunity is refused.
Limits
- One call, 45 seconds. A tool call that takes longer stops with “WebGlazer took too long to answer; try again”.
- Paged lists.
get_promptsreturns 50 rows by default,get_citationsandget_sourcesreturn 25. Each returns up to 100 rows per call. The agent pages through the rest withoffset. - Products.
list_productsreturns up to 100 products per page. - Sign-in sessions. A client that signed in renews its access on its own, but only for 90 days from the day you clicked Allow. This holds even if you use it every day. After 90 days, connect it again.
- Tokens. A generated token expires after 30 days.
Revoke access
Open the list
Find the connection
Revoke it
Troubleshooting
"project_id is required: call list_projects first"
"project_id is required: call list_projects first"
"no brand with that id on this connection"
"no brand with that id on this connection"
"this connection covers one brand; reconnect to use all brands"
"this connection covers one brand; reconnect to use all brands"
"The WebGlazer subscription for this project has ended"
"The WebGlazer subscription for this project has ended"
"WebGlazer could not check this project's subscription. Try again shortly."
"WebGlazer could not check this project's subscription. Try again shortly."
"Product visibility is not included in this project's WebGlazer plan"
"Product visibility is not included in this project's WebGlazer plan"
"This company is not active right now. Try again later."
"This company is not active right now. Try again later."
"WebGlazer took too long to answer; try again"
"WebGlazer took too long to answer; try again"
The approval screen says "Invalid connection link"
The approval screen says "Invalid connection link"
The results are from an older run
The results are from an older run
This server vs the docs MCP
WebGlazer has two MCP servers. They do different things:- The product MCP server (this page) reads your own WebGlazer data. It needs you to sign in or use a token.
- The docs MCP server at
https://webglazer.com/docs/mcpsearches these help docs only. It has no access to your account or data. Add it if you want your agent to answer “how do I” questions about WebGlazer.